
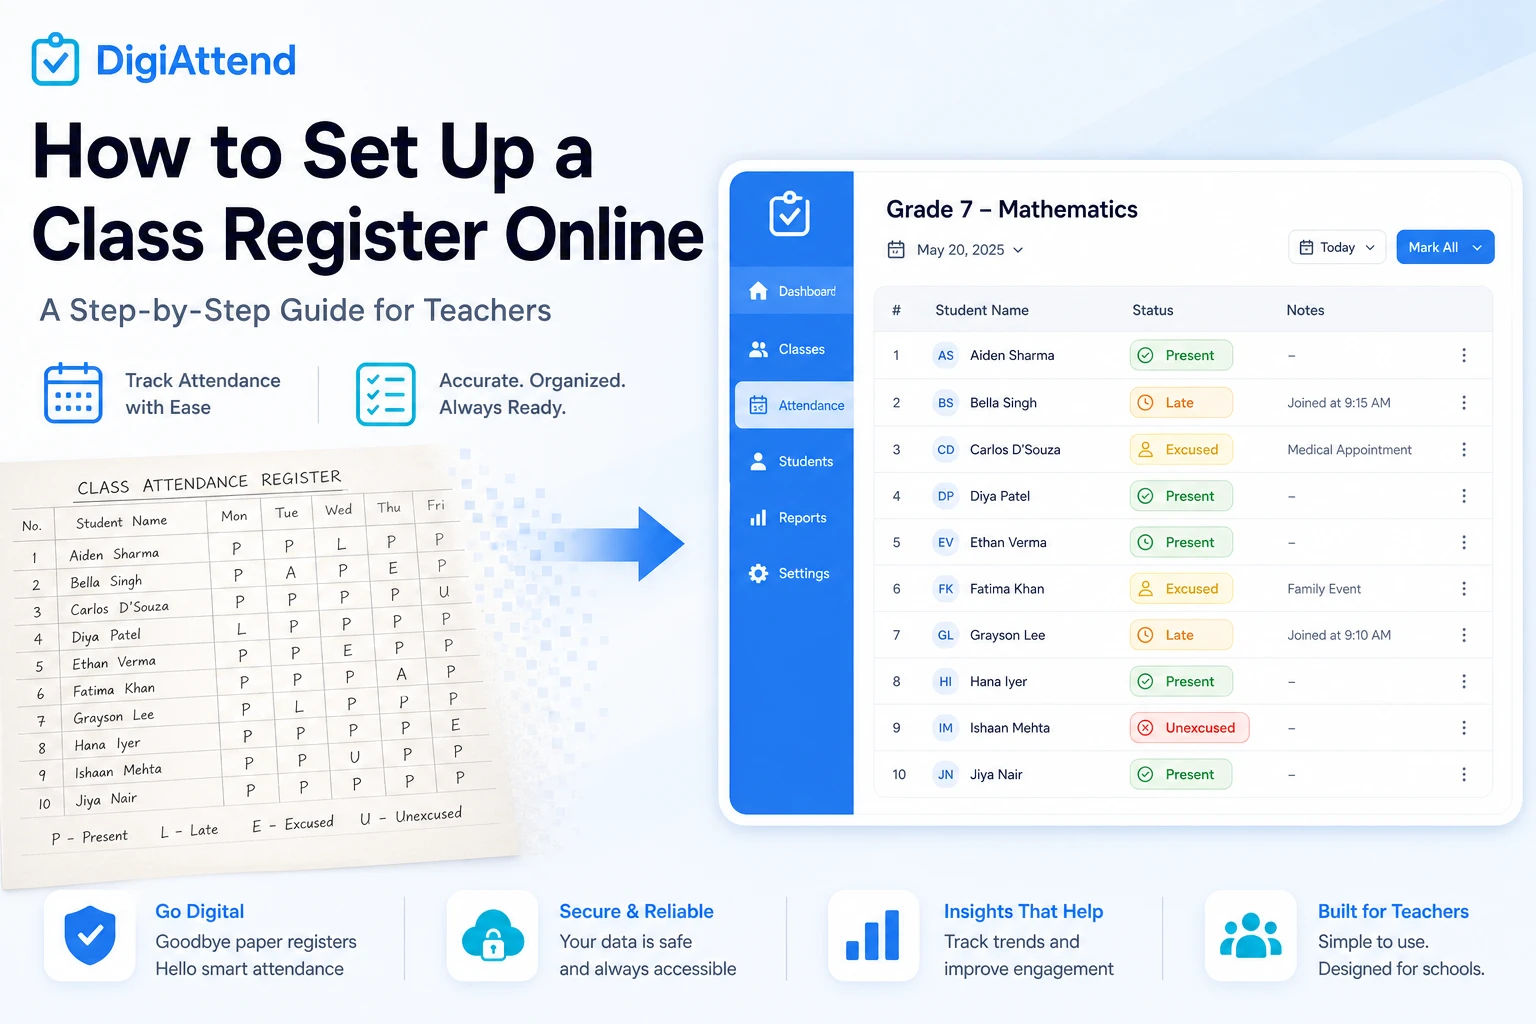
How to Set Up a Class Register Online: A Step-by-Step Guide for Teachers
Most teachers already understand what a class register is. You have been using one in some form since your first day in a classroom. Names down one side, dates across the top, a mark for each student each session. The format is familiar, the process is routine.
The problem is not the concept. It is the medium. Paper registers get left behind, damaged, or lost. Spreadsheets drift into disorganization as students are added mid-term and formulas start behaving unexpectedly. And at the end of the term, when someone needs a proper attendance report, both of those methods mean a significant amount of manual work before anything useful comes out.
Setting up an online class register for teachers is not a complicated project. If you can work a paper register, you can set up a digital one. The steps are straightforward, the setup takes less than an afternoon, and the daily workflow ends up being noticeably faster than what you are probably doing now.
This guide walks through the whole process from start to first marked session.
What an Online Class Register Actually Is
An online class register is a digital version of the attendance sheet teachers have always used. Instead of writing names on paper and marking each one by hand, you manage your student list and attendance records inside a web-based platform. The data is stored securely, organized automatically, and available whenever you need it.
A proper online class register covers the same ground as a paper one and then some:
A full student list with each student's details in one place. Date-based attendance records showing who was present, late, or absent on each session. Attendance status options that go beyond a simple tick or cross. Notes where needed for context. The ability to generate a clean report without doing any manual calculation.
The key difference from a paper register is what happens with the data once it is there. Instead of counting marks by hand at the end of the term, the system handles the calculations automatically. Instead of searching through notebooks to answer a parent's question, you pull up the record in seconds. The basic task is the same. The overhead around it disappears.
Why Teachers Are Moving Away From Paper Registers
The shift is happening gradually across schools and tutoring setups worldwide, and the reasons are practical rather than ideological.
Paper registers are physically fragile. A notebook that gets damaged, left in the wrong room, or simply goes missing takes the attendance data with it. There is no backup and no recovery option.
End-of-term reporting from paper is slow. Calculating attendance percentages for 30 students across a full term means counting every mark individually and doing the math manually. For multiple classes it can take hours.
Spreadsheets are better but still manual. You build the structure yourself, manage the formulas, and remember to exclude holidays from your calculations. One wrong cell reference and your percentage column is silently incorrect for weeks.
Neither method makes it easy to answer a parent's question about their child's attendance history on short notice. And neither scales well when a second class or a second teacher gets added.
Moving to an online register solves these problems at the source, not just at the reporting stage. When attendance is recorded correctly every day in a system designed for the job, everything downstream becomes easier.
Step 1: Choose the Right Online Class Register Tool
The first decision shapes everything else, so it is worth getting right.
The best online class register for a teacher is not necessarily the most feature-rich one. It is the one that fits how you actually work. For most teachers, tutors, and small schools, that means something that opens in a browser without requiring a download, takes minimal time to set up, handles the features you need without burying you in ones you do not, and is priced sensibly for an individual educator rather than a large institution.
DigiAttend is worth looking at here because it was built with exactly this audience in mind. It is browser-based, which means it works on any device you already have. It has a free plan that covers one class and up to 30 students with full access to core features, which is enough for many teachers to run a full term without paying anything. And the interface is straightforward enough that you do not need a tutorial video before your first session.
For larger setups with multiple teachers or multiple classes, paid plans expand the capacity without changing the core workflow. But for the purposes of this guide, the free plan is enough to walk through the entire setup.
Step 2: Create Your Account
Go to digiattend.com and click the sign-up option. You will need your name, email address, and a password that meets the security requirements: at least eight characters with a mix of uppercase, lowercase, a number, and a special character.
Once your details are submitted, check your email for a verification link and click it to confirm your account. This is a standard step and takes about 30 seconds.
After verification, log in and you will land on your dashboard. It will be empty because you have not created anything yet. That is the starting point for the next steps.
The account creation process is genuinely quick. Most teachers are logged in and looking at their dashboard within five minutes of starting.
Step 3: Set Up Your Class Register
This is where the actual structure of your register gets created.
Inside DigiAttend, each class register is its own contained unit with its own student list, timetable, academic year dates, and attendance records. You create one class for each group you teach. If you are a tutor with a single batch, you create one class. If you teach two separate subjects to two different groups, you create two classes.
When naming your class, be specific enough that it makes sense at a glance. Vague names become confusing once you have more than one or two classes in the system. Something like "Grade 7 Mathematics" or "Saturday English Batch Term 1" is much more useful three months from now than "Class A."
You can also set a class schedule here, the day of the week, the time, the room or location. This is optional but useful for staying organized, especially if you are teaching multiple groups across different time slots.
Step 4: Add Students to Your Register
Once the class is created, you add your students. You have two options here and which one you choose depends on your situation.
For a small group of five to ten students, adding them individually is quick enough. You enter the name, roll number, and any other details you want to store, and move to the next student.
For any group larger than that, bulk import saves a meaningful amount of time. DigiAttend has a template you download, fill in using Excel or Google Sheets, and upload back to the system. The template has columns for student name, roll number, and any custom fields you have set up. Fill it in with your existing student list and the whole class appears in the system in one upload.
Custom fields are worth setting up before the import if you want to store extra details. Parent phone numbers are the most common one, since they give you direct contact information inside the same place you track attendance. Emergency contact details, student IDs, or house and section assignments can also be stored here. They appear on each student's profile and carry through to exported reports.
Step 5: Configure Attendance Statuses
DigiAttend gives you four statuses to mark each student on any given day: Present, Late, Excused Absent, and Unexcused Absent.
This four-status system matters in practice because a simple present/absent split loses information you actually need. A student who missed class due to a hospital appointment is not the same situation as one who simply did not show up without any communication. A student who arrived 15 minutes late is worth recording differently from one who was on time.
Each status entry also supports an optional note. If you want to record that a student was late because of a transport issue, or that an absence was pre-approved by a parent, you can add that detail at the time of marking. That note sits inside the attendance record for that date and carries through to your reports, so it is available if you need it weeks or months later.
Step 6: Set Your Academic Year Dates
Each class in DigiAttend has its own academic year start and end date. Setting these is a quick step but an important one.
The reason this matters is that all your attendance reports and percentage calculations automatically stay within these boundaries. If your term runs from September to December, the system only pulls data from inside that window. Data from before the term started or after it ended does not bleed into your current year's records.
This is especially useful for tutors who run consecutive terms with the same platform. You archive the old term, set new dates for the current one, and your records stay cleanly separated without any manual sorting.
If your school or tutoring setup runs on a calendar that does not match a standard academic year, you can set whatever start and end dates reflect your actual situation. The system does not impose a fixed calendar on you.
Step 7: Add Your Holidays and Off-Days
Before you start marking daily attendance, take a few minutes to add your known holidays and off-days for the term.
This step matters more than people expect. Without it, any day when class was not held still appears in the system as a potential session. If a national holiday gets counted as a school day in the denominator of your attendance calculation, every student's percentage drops slightly for no real reason.
In DigiAttend, you can mark holidays globally so they apply to all classes, or specifically to individual classes if your timetable varies. You add the date and optionally a reason, "Public Holiday," "Class Cancelled," "Mid-Term Break," and from that point forward the system treats those dates as non-school days automatically. Attendance cannot be marked on those days, and they are excluded from every percentage calculation without you needing to adjust anything manually.
If a class gets cancelled unexpectedly mid-term, you can add that date as an off-day at any point and the system recalculates accordingly.
Step 8: Start Marking Attendance Daily
With the setup complete, the daily workflow is straightforward.
You open your class, select the date, and see your full student list. For each student, you click their status: Present, Late, Excused Absent, or Unexcused Absent. If you need to add a note you do so, and if not you move to the next student. Every entry saves automatically the moment you mark it. There is nothing to submit, nothing to sync, and nothing to lose.
For a class of 25 to 30 students, this process takes between 90 seconds and three minutes depending on whether you are adding notes. That is the full daily workflow. Open, mark, close.
If a student arrives late after you have already finished marking, you can go back into that day's record, update their status, and it saves instantly. There is no need to redo the whole session.
Step 9: Review and Export Reports
Once you have been marking attendance for a few weeks, your data becomes genuinely useful.
Inside DigiAttend you can view attendance history for the whole class or for individual students. This makes it easy to spot patterns: a student who has been late consistently, a student whose attendance is trending downward, a session where more than half the class was absent.
When you need a formal report, whether for a parent, a school administrator, or your own records, go to the Reports section, select your class and date range, and click Export to Excel. The file downloads immediately with a full breakdown for every student: total sessions, attendance count by status, percentage, and any notes attached to individual entries.
The date range automatically respects your academic year boundaries, so you will not accidentally include data from outside the current term. And because holidays and off-days were already excluded from the calculation, the percentages in the report are accurate without any manual adjustment.
For a parent asking how many sessions their child has attended this month, this whole process takes under a minute from opening the reports page to having a file ready to send.
Step 10: Adjust and Customize as You Go
Once you are running, the setup does not need to stay fixed. You can add new students to your class at any time. If a student joins mid-term, their record starts from the date they are added and their percentage is calculated from that point forward, not from the academic year start, which means mid-term joiners do not show unfairly low attendance.
You can also add or adjust custom fields, update class schedule details, or add new off-days as they arise. The system is designed to be maintained incrementally rather than locked in at setup.
If your student count or class count grows beyond the free plan's limit, upgrading to a paid plan carries all your existing data across. Your class structure, student records, and full attendance history remain exactly as they are.
Why DigiAttend Works Well as an Online Class Register
Pulling this all together: DigiAttend fits the online class register use case well because it was built around the same mental model teachers already use, a list of students, a date-based record, and a way to review the history.
The setup is fast. A solo teacher with one class can go from account creation to first marked session in under 30 minutes, including the time it takes to import a student list.
The daily workflow is simple enough to actually use every day, which is the only test that matters for a tool like this. A beautiful interface that teachers stop using after two weeks because it takes too long does not help anyone.
The reporting handles the calculations automatically, so the administrative work that used to happen at the end of every term largely disappears.
And the free plan gives you full access to all of this for one class and up to 30 students, permanently, with no credit card required.
Frequently Asked Questions
Q1: Do I need to download anything to use an online class register?
No. DigiAttend is entirely browser-based. It works on any modern browser on a phone, tablet, laptop, or desktop. You log in through the browser and everything is right there. No app store, no installation, no device-specific setup.
Q2: Can I use an online class register if I have multiple classes or subjects?
Yes. Each class or batch gets its own separate register within the system. DigiAttend's free plan covers one class. The Teacher plan at $19.99 per month supports up to five classes and 200 students, which covers most individual teachers who teach multiple groups.
Q3: What if I already have my student list in Excel or Google Sheets?
You can import it directly. Download DigiAttend's import template, copy your student data into the relevant columns, and upload the file. Your full class list is created in the system in seconds. You do not need to re-enter anything by hand.
Q4: Can I edit an attendance entry after I have already marked it?
Yes. You can go back into any date's attendance record and update a student's status at any point. The edit saves immediately. This is useful for adding a latecomer who arrived after you finished marking, or correcting an entry you made in error.
Q5: How does the system handle a student who joins my class partway through the term?
You add the student to your class at any time. Their attendance record begins from the date they are added. Attendance percentage calculations for that student start from their first entry, not from the academic year start date, so they are not penalized for sessions that happened before they joined.
Q6: Can I use DigiAttend on my phone during class?
Yes. The interface is fully responsive and works well on a phone screen. Many teachers mark attendance on their phone during the session rather than opening a laptop. The marking workflow is designed to be quick enough for this kind of on-the-go use.
Q7: Is my student data stored securely?
DigiAttend uses encrypted data storage and role-based access control. Your student records are accessible only to you through your account. The platform does not sell or share user data with third parties.
Q8: What happens to my data if I stop using DigiAttend?
You can export your full attendance data to Excel at any time. Your records are yours and can be downloaded whenever you need them. If you cancel a paid subscription, your account reverts to the free plan limits but your historical data remains accessible.
Final Thoughts
Setting up an online class register is one of those tasks that sounds more involved than it actually is. For most teachers, the whole process takes less than an afternoon the first time, and far less than that for every class you set up after the first one.
The daily time savings are modest on any given day, a few minutes per session. But across a full term, across multiple classes, and especially at the end of term when reports are due, those savings become significant. More importantly, the accuracy improves. When records are kept consistently in a system that handles the calculations and exclusions automatically, the data you have at the end of the term is data you can actually rely on.
If you still use a paper register or a spreadsheet for class attendance, the online alternative is simpler to start than you probably expect.
Try DigiAttend free at digiattend.com. No credit card needed and your first class is free for as long as you need it.